
Xero Tips & Tricks for Small Business

We have put together some Xero tips and tricks that will save you time and help you run your business more profitably.
1. Email PDF bills into your Xero Organisation
By forwarding PDF invoices straight into your Xero organisation using the unique Xero bills email address, this will automatically create a draft bill. The PDF needs to be an email attachment, not embedded in the body of the email.
Xero will automatically create and attach the PDF to a draft bill. There is an additional feature that is being gradually rolled out to organisations that will automatically populate some fields in the bill, you will just need to check and confirm the details.
You can find the Xero bills email address on any status tab in the Purchases screen.

2. Invoice Reminders
Invoice reminders allow you to automatically follow up on your outstanding invoices and get paid on time, in a way that best suits your business. Do you hate chasing your debtors?
This can be set up to automatically remind customers that are due or overdue by a certain number of days.
The template email reminder includes all the important details, but you can edit the wording and add any other details about the invoice that you would like to include. You can also add your preferred payment details to make it as easy as possible for your customer to pay.
NB: It is important to keep your Xero up to date. If customers have paid you and you haven’t yet applied payment to the invoice, they may get sent an email reminder.
3. Copy & Edit an Invoice
Rather than starting from scratch, Xero allows you to copy invoices you’ve raised previously to a new invoice or quote.
You can copy a single invoice, or multiple invoices with the same status, into a new invoice or quote. If you’re copying multiple invoices, Xero creates one draft invoice or quote with all of the line items from the original Xero invoices.
4. Create a Bank Rule
Bank rules are a time-saving way to reconcile regular bank statement lines relating to cash payments, that you haven’t already created transactions for in Xero.
You define the conditions for each rule to match with your imported bank statement lines.
When you go to reconcile your bank account, Xero will suggest a transaction for each bank statement line that matches a rule (using the conditions you’ve set). If the suggested transaction (based on the rule) isn’t quite right, you can edit it, create a new one, or find a transaction you’ve already entered into Xero to match with the bank statement line.
5. Custom Management Reports
These are a wonderful tool for giving you information about your business. Management reports can provide business owners with an overview of the business’ operations, show areas that need improvement and highlight areas where the business is performing well. In addition to looking at the usual things, such as profit for the period, you can focus on your direct costs and the return you are getting on these.
We can customise management reports for your business, so you can see just how well your business is performing each period – this can be monthly, quarterly or six-monthly, whatever suits your business. Our customised management reports can contain several reports, including Cash Summary, Profit and Loss report, Balance Sheet, Aged Receivables and Aged Payables.
If a budget has been completed for the period, there is also the option to compare actual performance against your budgeted figures.
6. Tracking Categories
Use Xero’s tracking categories to see how different areas of your business are performing (such as departments, cost centres, or locations).
You can create two active tracking categories and you are able to add up to 100 tracking options for each tracking category. For example, you could set up a Location tracking category. For this tracking category you could then add tracking options for each location of your business, say Christchurch, Auckland and Wellington.
This allows you to report income and expenses across each location, rather than setting up different accounts for each location. Once you have assigned a tracking option to your transactions, you will be able to review and filter reports by tracking category and category options to see the performance of different areas of your business.
Tracking categories are not designed to be used for job costing. We would suggest looking at Xero Projects or WorkflowMax as a job costing solution for your business.
7. Xero Expenses
Xero has launched an Expenses feature for all Xero Standard or Premium Business edition subscriptions. With the new Expenses feature, employees can capture receipts and submit claims for their work expenses with their mobile device. Save time and admin costs.
How it works:
- Employees can capture receipts and submit claims for their work expenses with iOS and Android devices.
- By enabling the new Xero Expenses feature, you’re allowing a trusted third-party to convert your scanned receipt into text and create a draft expense claim.
- Simply capture the receipt in the app, select use image, enter what the receipt was for and click submit. To enter the details yourself, you then need to go into the expense claim that you just created and click ‘Fill it out myself’.
- Authorised approvers can review and approve expense claims, manage, pay and report on them.
- Administrators can split claims into itemised lines to allocate to multiple accounts within one receipt.
Subscriptions to Xero Expenses are based on a fixed monthly fee and a per-user basis. 1 user of Xero Expenses is included in the Standard and Premium plans, then $5 per month for each additional active user is charged.
8. Use the Inbuilt calculator
Use Xero’s inbuilt calculator to work out your transaction and manual journal amounts.
In transactions such as invoices, you can enter a basic arithmetic operation into the fields Quantity, Unit Price and Discount. Xero calculates the result when you press Enter or Tab. You can use brackets and *, /, + or -, and your formula can be as complex as you like.

9. Search Function
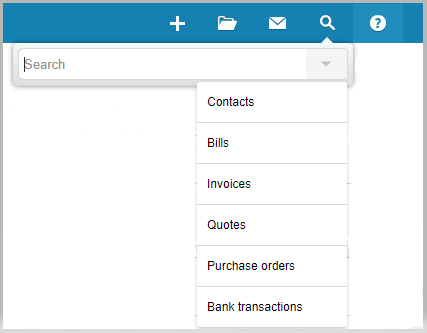
One of the best features in Xero is the search function. This allows you to find what you’re looking for quickly, without having to know exactly where to look. For example, you could type in “300.50” and it will bring up all transactions for that amount.
Click on the magnifying glass in the top right-hand corner of your screen, visible in most areas of Xero. You can search for an amount, contact, date etc.
10. The + icon
If you use Xero a lot, then you may as well reduce the number of times you have to click with your mouse. In the top right-hand corner there is a + icon. You may find you want to use it to enter invoice and bills, rather than go through the drop-down menus like you used to.
Summary
Many of these tips and tricks can be found in Xero Central, a helpful resource for all things Xero – https://central.xero.com/s/
Xero are also due to release a new-look layout in the Demo company in November, which simplifies the current drop-down menu headers. This new-look layout will likely become the format that everyone sees when they use Xero.
If you need more Xero guidance or have any questions, please do not hesitate to contact us.
DISCLAIMER: Our blog posts are of general nature and are intended to provide basic guidance. They are not intended to constitute accounting, tax, or other professional advice.